Chapter 2 – Tender Listing, Tender Detail Page & Tender File Download
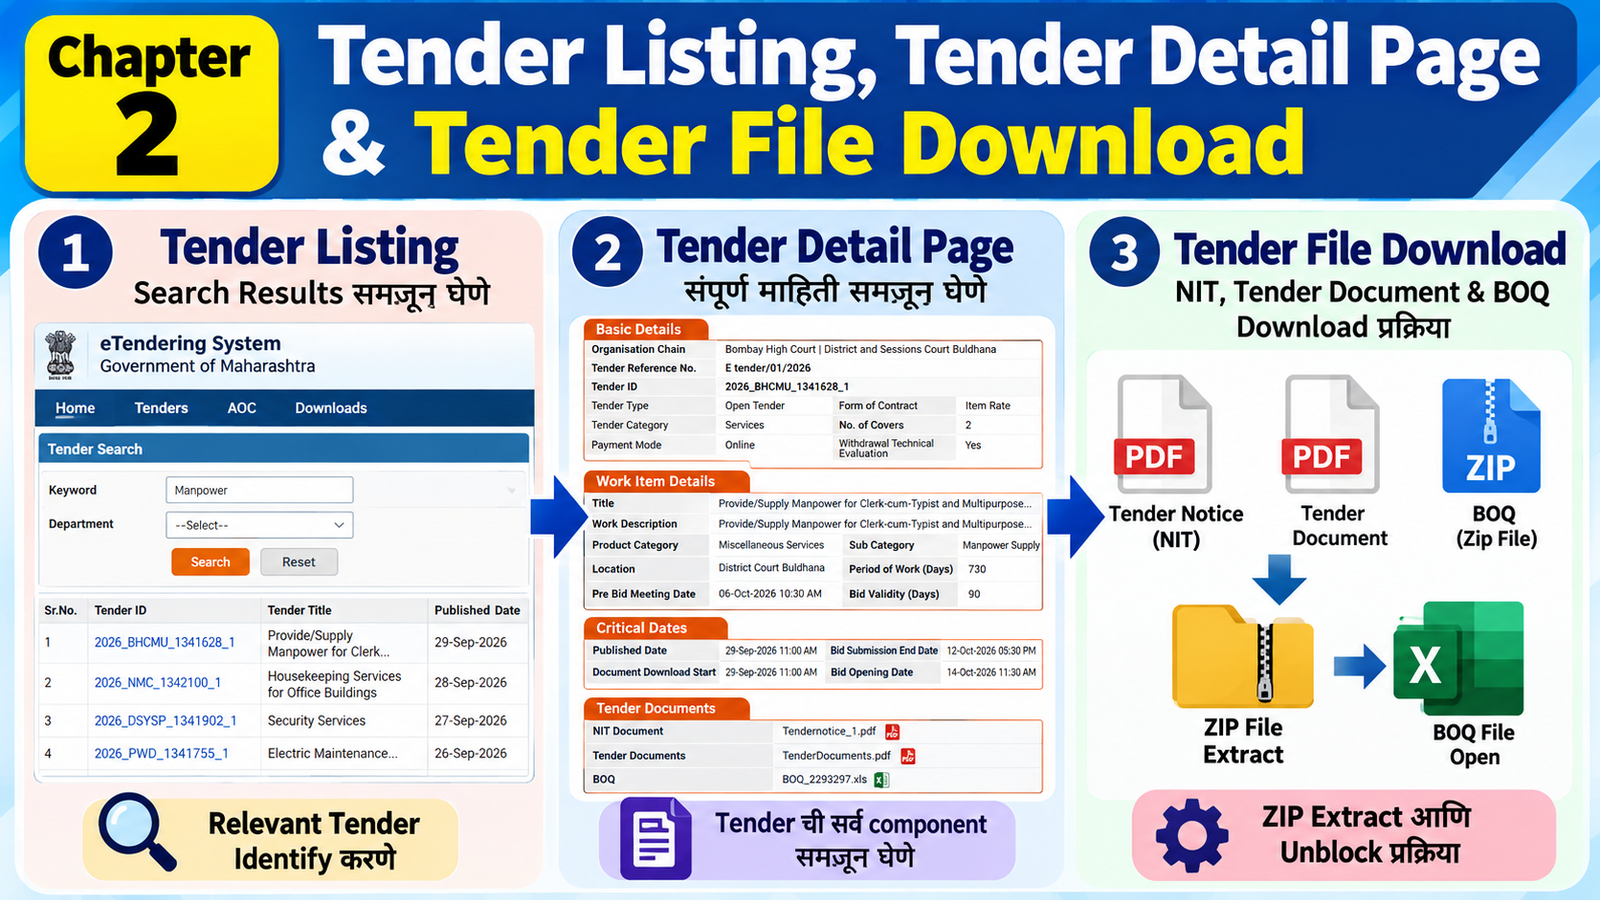
Topic 1 – Tender Listing / Search Results
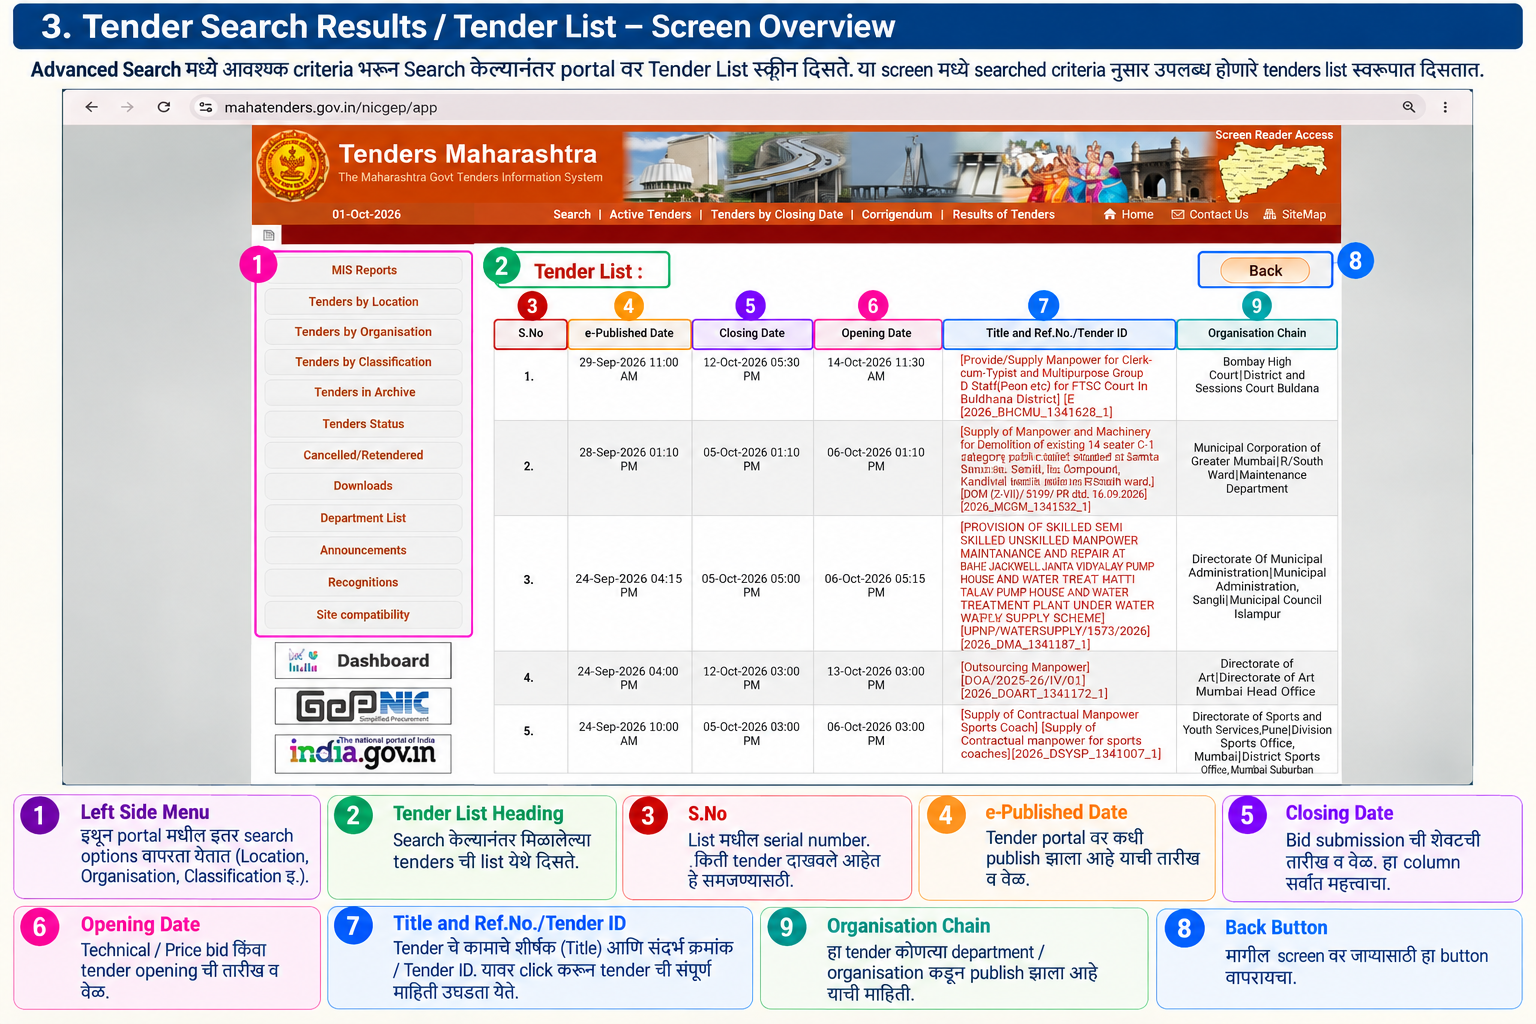
MahaTenders वर Keyword Search, Tender by Organisation किंवा Advanced Search केल्यानंतर search result म्हणून जी list दिसते, तिला Tender Listing म्हणता येईल. ही screen म्हणजे आपल्या searchचा output आहे. Tender Executive रोज मोठ्या प्रमाणात tenders शोधत असल्यामुळे या listingकडे व्यवस्थित वाचण्याची पद्धत असणे महत्त्वाचे आहे. Search केल्यानंतर आलेल्या प्रत्येक tenderवर लगेच click करण्याऐवजी प्रथम listingमध्ये दिसणारी basic information पाहून कोणते tenders आपल्या कामाशी संबंधित आहेत हे identify करायचे.
Tender Listingचा मुख्य उपयोग
Tender Listingचा उद्देश संपूर्ण tender समजून घेणे नाही, तर search केलेल्या results मधून योग्य opportunities शोधणे हा आहे. उदाहरणार्थ आपण Housekeeping keyword search केला आणि 20 results आले, तर त्या 20 resultsमध्ये कोणते housekeepingशी खरोखर संबंधित आहेत, कोणते दुसऱ्या प्रकारचे काम आहे आणि कोणते आपल्या companyसाठी उपयोगाचे नाहीत हे listing पाहून प्राथमिक स्वरूपात ओळखता येते.
म्हणून Tender Listingला आपण Tender Searchची Screening Stage म्हणू शकतो.
1.1 Tender Title
Listingमध्ये दिसणारा Tender Title हा सर्वात आधी पाहायचा भाग आहे. Title वाचून departmentला कोणते काम करून घ्यायचे आहे याचा प्राथमिक अंदाज येतो.
उदाहरणार्थ:
- Housekeeping Services
- Security Services
- Providing Manpower
- Supply of Drivers
- Facility Management Services
यातून Tender Executiveला tender आपल्या business scopeमध्ये येतो का याची पहिली कल्पना येते.
परंतु titleमध्ये एखादा keyword आहे म्हणून tender लगेच relevant आहे असे मानायचे नाही. Title हा initial identification साठी आहे.
1.2 Tender ID / Reference Number
प्रत्येक tenderसमोर Tender ID किंवा Reference Number दिसतो. हा त्या tenderची unique identification आहे.
आपल्या practical workingमध्ये Tender ID अत्यंत महत्त्वाचा आहे कारण पुढे tenderबाबत internal discussion करताना:
“तो housekeeping tender”
असे म्हणण्यापेक्षा
“Tender ID ______ असलेला housekeeping tender”
असे reference देणे अधिक professional आणि error-free आहे.
Tender ID पुढे tender folder, tracker, email communication आणि internal recordsमध्येही उपयोगी पडतो.
Organisation Short Code ओळखण्याची सवय
काही Tender IDs मध्ये organisationचा short code दिसतो. उदाहरणार्थ आपण आधी पाहिल्याप्रमाणे:
- BHCMU – Bombay High Court, Mumbaiशी संबंधित short code
- NMC – Nashik Municipal Corporation
- DSYSP – Directorate of Sports and Youth Services, Pune
म्हणून अनुभवी Tender Executiveने Tender ID पाहिल्यावर त्यातील organisation code ओळखण्याचा प्रयत्न केला पाहिजे. यामुळे list पाहतानाच tender कोणत्या organisationशी संबंधित आहे याची प्राथमिक कल्पना मिळते.
तरीही short code ही identificationची practical clue आहे; final organisation confirmation portalवरील उपलब्ध organisation informationमधूनच करायची.
1.3 Organisation
Tender Listingमध्ये organisationची माहिती उपलब्ध असल्यास ती पाहणे आवश्यक आहे.
कारण एकाच keywordवर वेगवेगळ्या Government Departments, Municipal Corporations, Hospitals, Universities, Boards किंवा इतर authoritiesचे tenders येऊ शकतात.
उदाहरणार्थ आपण Security search केले तर:
- Municipal Corporationचा tender
- Government Hospitalचा tender
- Universityचा tender
- Government Departmentचा tender
असे वेगवेगळे results एकाच listमध्ये दिसू शकतात.
त्यामुळे Title + Organisation एकत्र वाचल्याने tenderची प्राथमिक ओळख अधिक स्पष्ट होते.
1.4 e-Published Date
Listingमध्ये e-Published Date किंवा Published Date दिसत असल्यास ती tender portalवर publish झाल्याची प्राथमिक माहिती देते.
Daily tender searchingमध्ये याचा उपयोग विशेषतः नवीन आलेले tenders ओळखण्यासाठी होतो.
उदाहरणार्थ Tender Executiveने आज search केला आणि listमध्ये काही tenders नुकतेच publish झालेले दिसले, तर ते नवीन opportunities म्हणून shortlist करता येतात.
यामुळे daily searchमध्ये जुने आणि नवीन results वेगळे ओळखणे सोपे होते.
1.5 Closing Date
Tender Listingमध्ये दिसणारी Closing Date ही practical workingसाठी अत्यंत महत्त्वाची माहिती आहे.
Search resultमध्ये एकाच वेळी अनेक tenders दिसत असल्यामुळे closing date पाहून Tender Executiveला कोणत्या tenderकडे आधी लक्ष द्यायचे याची प्राथमिक priority ठरवता येते.
उदाहरणार्थ:
- Tender A – Closing tomorrow
- Tender B – Closing after 5 days
- Tender C – Closing after 15 days
तर naturally Tender Aची screening आधी करणे आवश्यक आहे.
परंतु listingमध्ये दिसणारी date ही initial screening information म्हणून घ्यायची. पुढील detailed verification योग्य tender pageवर केली जाते — त्याचा भाग आपण या topicमध्ये घेणार नाही.
1.6 Tender Listमध्ये Relevant आणि Irrelevant Tenders वेगळे करणे
Listing पाहताना Tender Executiveने प्रत्येक resultसाठी साधा प्रश्न विचारायचा:
“हा tender आपल्या companyच्या कामाशी संबंधित दिसतो का?”
जर होय → पुढील stageसाठी shortlist.
जर title अस्पष्ट असेल → further checkingसाठी ठेवायचा.
जर स्पष्टपणे आपल्या कामाशी संबंध नसेल → त्या searchमध्ये पुढे जायचे.
उदाहरणार्थ आपण Manpower search केले आहे आणि listमध्ये:
Security Manpower → Relevant
Housekeeping Manpower → Relevant
IT Technical Manpower → Company capabilityवर अवलंबून
Medical Manpower → शक्यतो irrelevant
अशी प्राथमिक screening करता येते.
1.7 Tender Listingमध्ये एक महत्त्वाची Practical गोष्ट – Similar Results
कधी कधी search केल्यावर एकाच organisationचे किंवा एकाच प्रकारचे अनेक tenders listमध्ये दिसतात.
उदाहरणार्थ:
- Housekeeping Services – Hospital A
- Housekeeping Services – Hospital B
- Housekeeping Services – Office Building
- Housekeeping Services – University
सगळ्या titlesमध्ये Housekeeping समान असले तरी ते वेगवेगळे opportunities आहेत.
म्हणून Tender Executiveने फक्त title पाहून duplicate समजू नये.
Tender ID आणि Organisation यांचा reference घेऊन प्रत्येक opportunity वेगळी ओळखायची.
1.8 Tender Listingमध्ये Search Result चुकण्याची शक्यता
Search result list म्हणजे portalवरील सर्व संभाव्य tendersची absolute guarantee आहे असे समजायचे नाही.
आपण Housekeeping search केले आणि काही tender मिळाले नाहीत, याचा अर्थ Housekeepingचे कोणतेही tender portalवर नाही असा थेट निष्कर्ष काढायचा नाही.
कारण:
- दुसऱ्या terminologyचा वापर झालेला असू शकतो
- titleमध्ये आपल्या अपेक्षित keywordचा वापर नसू शकतो
- दुसऱ्या search methodने tender मिळू शकतो
म्हणूनच Chapter 1मध्ये शिकवलेली multiple search methodology महत्त्वाची ठरते.
1.9 Listingचा उपयोग Tender Executiveच्या Daily Workमध्ये
Daily tender deskवर search result आल्यावर Tender Executiveने listingमधून relevant opportunitiesची प्राथमिक shortlist तयार करावी.
उदाहरणार्थ internal workingमध्ये:
| Tender ID | Title | Organisation | Closing | Initial Status |
|---|---|---|---|---|
| XXXXX | Housekeeping Services | Govt Hospital | 05 Oct | Review |
| XXXXX | Security Services | Municipal Corp. | 07 Oct | Review |
| XXXXX | IT Manpower | Govt Dept. | 09 Oct | Not Relevant |
अशा प्रकारे listingमधून आलेली माहिती पुढील tender monitoringमध्ये वापरता येते.
1.10 Tender Listing पाहण्याची Practical Reading Order
Fresher Tender Executiveने list उघडल्यानंतर प्रत्येक resultसाठी साधारणपणे हा क्रम वापरावा:
1. Tender ID पाहा
↓
2. Tender Title वाचा
↓
3. Organisation पाहा
↓
4. Published Date पाहा
↓
5. Closing Date पाहा
↓
6. आपल्या businessशी relevance ठरवा
↓
7. Relevant tender shortlist करा
हा sequence रोजच्या tender searchingमध्ये speed आणि accuracy दोन्ही वाढवतो.
Practical Rule
Tender Listingकडे पाहताना एक गोष्ट कायम लक्षात ठेवायची:
“Search Result दिसणे म्हणजे Tender समजणे नाही; Search Resultमधून योग्य Tender ओळखणे ही पहिली skill आहे.”
Tender Executiveची quality यावरूनही दिसते की तो 100 resultsमधून 10 genuinely relevant tenders किती पटकन आणि अचूकपणे identify करू शकतो.
म्हणून Tender Listing हा फक्त portalचा एक page नसून Tender Search आणि पुढील detailed tender study यांच्यामधला practical screening point आहे.
—————————————————————————————————————————————————————————
Topic 2 : Tender Detail Page – Portal वरील प्रत्येक माहितीचा सखोल अभ्यास
Advanced Search किंवा Tender List मधून एखादा योग्य tender सापडल्यानंतर Tender Title / Tender ID / Reference Number वर click केल्यावर Tender Detail Page उघडतो. हा page म्हणजे त्या tender ची portal-level information sheet आहे. Tender Executive साठी हा page अत्यंत महत्त्वाचा आहे कारण येथे tender ची basic identity, tender type, organisation, important dates, payment requirements, EMD, covers, work details, tender documents आणि inviting authority यांची प्राथमिक माहिती एकाच ठिकाणी दिसते. मात्र एक महत्त्वाची गोष्ट लक्षात ठेवावी—Tender Detail Page हा tender समजण्याचा पहिला structured reference आहे; final decision घेण्यासाठी portal वर उपलब्ध NIT, Tender Document, BOQ, corrigendum आणि इतर संबंधित documents पूर्णपणे वाचणे आवश्यक आहे. Portal page वरील माहितीवरून tender ची दिशा समजते; पण eligibility, scope, terms, manpower requirement, specifications, penalties, payment conditions इत्यादींची अंतिम खात्री tender documents मधूनच करावी.
2.1 Basic Details – Tender ची मूलभूत ओळख
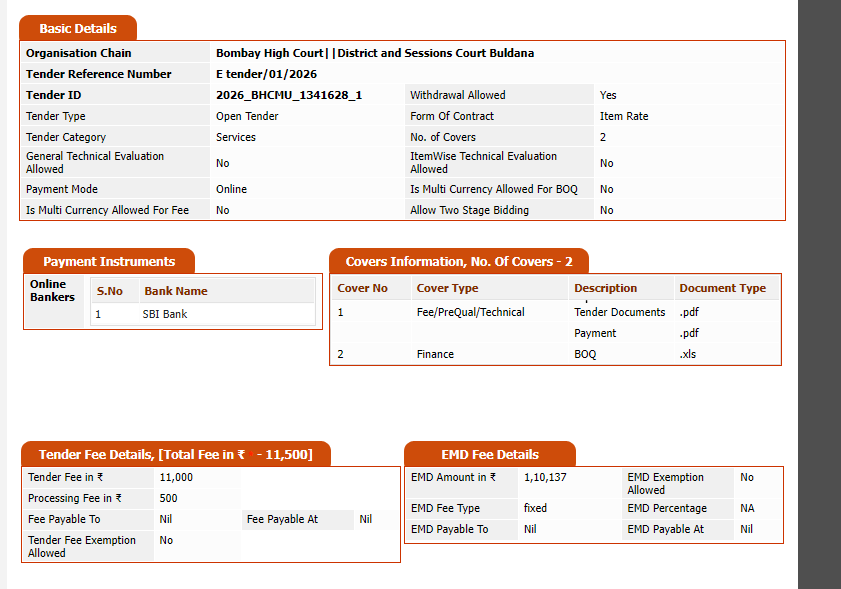
Tender Detail Page वर सर्वप्रथम Basic Details हा भाग दिसतो. हा भाग tender ची ओळख निश्चित करण्यासाठी वापरला जातो. Tender Executive ने हा section फक्त वरवर पाहू नये. Tender कोणत्या organisation ने काढला आहे, tender reference number काय आहे, Tender ID काय आहे, tender open/limited आहे का, category कोणती आहे, किती covers आहेत, payment mode काय आहे आणि technical evaluation कशी होणार आहे याची प्राथमिक माहिती याच section मधून मिळते. त्यामुळे एखादा tender shortlist केल्यानंतर सर्वप्रथम Basic Details पाहणे ही practical working habit असली पाहिजे.
Organisation Chain
Organisation Chain मध्ये tender कोणत्या विभागाने किंवा कोणत्या authority/office ने publish केला आहे हे दिसते. आपल्या screenshot मध्ये Organisation Chain म्हणून Bombay High Court | District and Sessions Court Buldhana दिसत आहे. याचा अर्थ tender फक्त “Court” related आहे एवढेच नाही, तर tender publish करणारी specific administrative chain कोणती आहे हे समजते.
Tender Executive साठी Organisation Chain महत्त्वाची कारण tender ची authority समजल्यावर पुढील tender documents मध्ये authority चे नाव, address, work location, correspondence requirements, experience criteria किंवा department-specific conditions शोधणे सोपे होते. याच माहितीच्या आधारे tender folder मध्ये department चे योग्य नाव ठेवता येते आणि पुढील correspondence करताना चुकीच्या authority ला letter जाण्याची शक्यता कमी होते.
2.2. Tender Reference Number
Tender Reference Number हा department/organisation कडून त्या tender ला दिलेला reference असतो. Screenshot मध्ये तो E tender/01/2026 असा दिसतो.
Tender Reference Number आणि Tender ID हे एकच असतात असे समजू नये. अनेक वेळा department स्वतःच्या internal/administrative system नुसार reference number तयार करते, तर portal tender ला स्वतःची Tender ID structure देऊ शकतो.
Practical tender work मध्ये Reference Number खूप उपयोगी आहे. Tender Executive ने quotation, clarification, representation, pre-bid communication, payment-related correspondence किंवा department follow-up करताना tender ची ओळख स्पष्ट करण्यासाठी Tender Reference Number, Tender ID आणि Tender Title योग्य पद्धतीने वापरले पाहिजेत. Tender folder च्या नावातही हे reference ठेवले तर नंतर हजारो tender files मध्ये specific tender शोधणे सोपे होते.
2.3. Tender ID – Tender ची Digital Identity
Tender ID हा portal वरील tender ची एक अत्यंत महत्त्वाची unique identity आहे. Screenshot मध्ये Tender ID 2026_BHCMU_1341628_1 असा दिसत आहे.
इथे Tender Executive ने फक्त number म्हणून Tender ID पाहायचा नाही. Practical tendering मध्ये Tender ID वाचण्याची सवय विकसित करणे महत्त्वाचे आहे. या example मध्ये BHCMU हा organisation चा short code आहे आणि तो Bombay High Court, Mumbai या organisation शी संबंधित आहे. वेगवेगळ्या organisations साठी अशाच प्रकारे short codes वापरले जाऊ शकतात. उदाहरणार्थ, Nashik Municipal Corporation साठी NMC, तर Directorate of Sports and Youth Services, Pune साठी DSYSP सारखा short code दिसू शकतो.
म्हणून Tender Executive ने Tender ID पाहताना त्यामध्ये organisation चा short code कोणता आहे हे ओळखण्याची सवय लावली पाहिजे. Tender ID ची exact structure प्रत्येक portal/organisation च्या system नुसार बदलू शकते; त्यामुळे ती प्रत्येक ठिकाणी एकच fixed formula आहे असे गृहीत धरू नये. पण practical level वर year + organisation short code + unique tender/serial identification अशा pattern मधून tender ची ओळख पटकन करता येते.
ही skill विशेषतः मोठ्या tender desk वर उपयोगी पडते. समजा search result मध्ये अनेक tenders आहेत आणि titles लांबलचक आहेत. Tender ID मध्येच BHCMU दिसले तर tender कोणत्या organisation शी संबंधित आहे याचा प्राथमिक अंदाज लगेच येतो. तसेच NMC, DSYSP इत्यादी codes वारंवार पाहिल्यानंतर tender executive ला organisation codes लक्षात राहतात. त्यामुळे Tender ID हा फक्त portal वर click करण्यासाठीचा number नसून tender identification आणि document control साठी वापरता येणारा practical reference आहे.
2.4. Tender Type
Screenshot मध्ये Tender Type – Open Tender असे दिसते.
Tender Type म्हणजे department ने tender participation साठी कोणती bidding methodology वापरली आहे याची प्राथमिक माहिती. Open Tender असल्यास portal वर पात्र असलेल्या interested bidders ना निर्धारित conditions पूर्ण करून participate करण्याची संधी असते.
Tender Executive साठी हे महत्त्वाचे कारण tender open आहे म्हणून company automatically eligible आहे असे होत नाही. Open Tender म्हणजे participation open आहे; पण eligibility criteria, turnover, experience, licences, registrations, technical qualification, financial capacity, EMD आणि इतर ATC/STC conditions पूर्ण करणे आवश्यक असते.
म्हणून Tender Type पाहिल्यानंतर पुढची practical action म्हणजे Tender Document/NIT मधील eligibility आणि qualification conditions तपासणे.
2.5. Withdrawal Allowed
Screenshot मध्ये Withdrawal Allowed – Yes दिसत आहे.
या field चा अर्थ tender submission system मध्ये bid withdrawal ची सुविधा उपलब्ध आहे की नाही हे दर्शवणे. पण Tender Executive ने याकडे “bid submit केली आणि नंतर कधीही withdraw करू” अशा पद्धतीने पाहू नये.
Bid withdrawal ची facility उपलब्ध असली तरी तिचा वापर portal rules, specified time limit आणि tender conditions नुसारच करावा लागतो. त्यामुळे bid submit करण्यापूर्वी documents, BOQ, rates, EMD, declarations आणि technical uploads यांची final verification करणे हेच योग्य professional practice आहे.
2.6. Form of Contract
Screenshot मध्ये Form of Contract – Item Rate दिसते.
Form of Contract म्हणजे department कोणत्या प्रकारच्या contractual pricing structure वर tender process करत आहे याची प्राथमिक माहिती. Item Rate tender मध्ये प्रत्येक item/work component साठी rate structure असू शकते आणि bidder ला BOQ मध्ये संबंधित items साठी rates quote करावे लागतात.
याचा costing वर थेट परिणाम होतो. Tender Executive ने फक्त tender value पाहून rate decision घेऊ नये. BOQ मधील quantities, units, specifications, scope, applicable taxes, manpower/material/equipment requirements आणि payment conditions तपासणे आवश्यक असते.
2.7. Tender Category
Screenshot मध्ये Tender Category – Services दिसते.
Tender Category पाहून tender broadly Works, Services, Goods किंवा portal वर उपलब्ध संबंधित category मध्ये येतो का हे समजते. आपल्या company सारख्या manpower, housekeeping, security, facility management किंवा service-based कामांसाठी Services category विशेषतः महत्त्वाची ठरू शकते.
पण “Services” category दिसली म्हणून tender आपल्या company साठी योग्य आहे असे लगेच मानू नये. Actual scope काय आहे, manpower किती आहे, qualification काय आहे, equipment/consumables कोण देणार, statutory compliance कोणाची आहे आणि payment structure काय आहे हे Tender Document मधून तपासावे लागते.
2.8. General Technical Evaluation Allowed
Screenshot मध्ये General Technical Evaluation Allowed – No दिसते.
हा portal-level technical evaluation configuration शी संबंधित field आहे. Tender Executive ने या field चा अर्थ “technical evaluation होणारच नाही” असा काढू नये. कारण tender-specific technical qualification, document scrutiny किंवा eligibility conditions वेगळ्या स्वरूपात असू शकतात.
म्हणून हा field portal configuration समजण्यासाठी उपयोगी आहे; परंतु bidder ची actual technical eligibility ठरवण्यासाठी NIT, Tender Document, qualification criteria आणि ATC/STC वाचणे आवश्यक आहे.
2.9. No. of Covers – 2
Screenshot मध्ये No. of Covers – 2 दिसते.
याचा अर्थ tender submission दोन वेगळ्या covers/parts मध्ये structured आहे. Screenshot मधील पुढील section मध्ये त्याचे स्वरूप दिसते:
- Cover 1 – Fee/PreQual/Technical
- Cover 2 – Finance
ही माहिती Tender Executive साठी अत्यंत practical आहे. कारण bidder ने कोणते documents technical/fee cover मध्ये upload करायचे आणि financial information कुठे submit करायची याची basic direction यावरून मिळते.
विशेषतः financial bid मध्ये rate चुकीच्या cover मध्ये upload करणे, technical cover मध्ये financial information देणे किंवा required document miss करणे यामुळे bid-related problem निर्माण होऊ शकते. म्हणून No. of Covers आणि Covers Information हा section submission करण्यापूर्वी जरूर verify करावा.
2.10. Payment Mode
Screenshot मध्ये Payment Mode – Online आहे.
याचा अर्थ tender-related applicable payments portal/system मार्फत online mode मध्ये process करण्याची व्यवस्था आहे. Tender Executive ने payment mode पाहिल्यानंतर tender fee/processing fee/other applicable payment requirements वेगळ्या तपासाव्यात.
Payment mode online आहे म्हणून payment successful झाला असे गृहीत धरू नये. Actual transaction करताना payment status, transaction/reference number आणि portal वर payment acknowledgement/updated status यांची नोंद ठेवणे महत्त्वाचे आहे.
2.11. Multi-Currency Related Fields
Screenshot मध्ये:
- Is Multi Currency Allowed for Fee – No
- Is Multi Currency Allowed for BOQ – No
असे fields दिसतात.
यांचा उपयोग tender मध्ये fees किंवा BOQ financial quotation वेगवेगळ्या currencies मध्ये स्वीकारली जाणार आहे का हे समजण्यासाठी होतो. आपल्या screenshot मध्ये दोन्ही ठिकाणी No असल्यामुळे tender ची financial submission Indian currency framework मध्येच असल्याचा portal-level indication मिळतो.
Tender Executive ने अशा fields कडे दुर्लक्ष करू नये, विशेषतः मोठ्या procurement किंवा specialised tenders मध्ये currency-related conditions costing वर परिणाम करू शकतात.
2.12. Payment Instruments – Online Bankers
Screenshot मध्ये Payment Instruments section मध्ये Online Bankers – SBI Bank दिसते.
हा section tender-related online payment साठी portal वर उपलब्ध/स्वीकारलेले banking/payment instrument कोणते आहे हे दर्शवतो. Tender Executive ने tender fee किंवा applicable online payment करताना portal वर दाखवलेली payment mechanism आणि bank/payment option पाहून transaction करावी.
महत्त्वाचे म्हणजे payment केल्यानंतर transaction details, payment receipt/acknowledgement आणि portal status tender file मध्ये ठेवणे चांगली document-control practice आहे. भविष्यात payment status वर dispute झाल्यास हे records उपयोगी पडतात.
2.13. Covers Information – No. of Covers = 2
हा section Tender Executive ने विशेष लक्ष देऊन पाहावा.
Screenshot मध्ये दोन covers दिसतात:
Cover 1 – Fee / PreQual / Technical
या cover मध्ये tender fee/payment-related documents, pre-qualification documents आणि technical documents असू शकतात. Screenshot मध्ये description म्हणून Tender Documents आणि Payment तसेच document type .pdf दिसतो.
याचा practical अर्थ असा की bidder ने technical/fee side वर मागितलेली माहिती prescribed format मध्ये upload करणे आवश्यक असते. पण exact documents कोणते आहेत हे या table वरून पूर्णपणे ठरत नाही. त्यासाठी NIT/Tender Document मधील document checklist पाहणे आवश्यक आहे.
Cover 2 – Finance
दुसरा cover Finance आहे आणि screenshot मध्ये BOQ – .xls दिसत आहे.
याचा अर्थ financial bid साठी BOQ file वापरली जात आहे. Tender Executive ने BOQ file download करून तिची structure, item description, quantity, unit आणि applicable columns समजून घेऊनच quotation तयार करावे. BOQ मध्ये अनावश्यक structural changes करणे किंवा portal ने सांगितलेल्या format बाहेर file तयार करणे धोकादायक ठरू शकते.
2.14. Tender Fee Details
Screenshot मध्ये Tender Fee Details section आहे. येथे:
- Tender Fee – ₹11,000
- Processing Fee – ₹500
- Fee Payable To – Nil
- Fee Payable At – Nil
- Tender Fee Exemption Allowed – No
अशी माहिती दिसते.
इथे एक महत्त्वाची practical distinction समजून घ्या: Tender Fee आणि Processing Fee एकच गोष्ट नाहीत. Tender Fee department/tender issuing authority शी संबंधित असू शकते, तर processing fee portal/service mechanism शी संबंधित असू शकते. Screenshot मध्ये Total Fee ₹11,500 दिसत असल्यामुळे ₹11,000 + ₹500 अशी composition आहे.
आपण आधीच्या tender-training मध्ये Tender Fee बद्दल सविस्तर चर्चा केलेली असल्यामुळे येथे त्याची पूर्ण theory पुन्हा repeat करण्याची गरज नाही. पण Tender Detail Page पाहताना Tender Executive ने Fee amount, processing fee, exemption allowed आहे का, payment mode आणि payment deadline हे निश्चितपणे identify केले पाहिजे.
विशेषतः screenshot मध्ये Tender Fee Exemption Allowed – No दिसत असल्यामुळे bidder ला exemption available आहे असे स्वतःहून गृहीत धरता येणार नाही. Tender-specific conditions आणि applicable portal rules verify करणे आवश्यक आहे.
2.15. EMD Fee Details
Screenshot मध्ये EMD Fee Details section आहे:
- EMD Amount – ₹1,10,137
- EMD Fee Type – Fixed
- EMD Exemption Allowed – No
- EMD Percentage – NA
- EMD Payable To – Nil
- EMD Payable At – Nil
EMD हा tender participation मधील अत्यंत महत्त्वाचा financial requirement आहे. आपण आधीच्या मुख्य manual मध्ये EMD ची eligibility, exemption, refund, forfeiture आणि पुढील Security Deposit conversion याबद्दल स्वतंत्रपणे सविस्तर अभ्यास केला असल्यामुळे येथे पुन्हा संपूर्ण theory repeat करण्याऐवजी Tender Detail Page वर EMD field कसा identify करायचा आणि त्याचा tender scrutiny मध्ये कसा उपयोग करायचा हे समजणे महत्त्वाचे आहे.
या screenshot मध्ये EMD Fixed आहे आणि amount ₹1,10,137 आहे. म्हणजे bidder ने tender participation पूर्वी या financial requirement ची व्यवस्था करणे आवश्यक आहे. EMD Exemption Allowed – No हा field देखील अत्यंत महत्त्वाचा आहे. Company MSME/other exemption claim करू शकते असे general knowledge असले तरी त्या specific tender मध्ये exemption allowed आहे का हे portal आणि tender conditions वरून तपासले पाहिजे.
Tender Executive ने Tender Detail Page वर EMD पाहिल्यानंतर लगेच आपल्या GO/NO-GO costing sheet किंवा tender summary मध्ये EMD amount नोंदवावा. कारण EMD चा cash-flow planning, bid participation decision आणि submission readiness वर थेट परिणाम होतो.
2.16. Work Item Details – Tender ने नेमके कोणते काम मागितले आहे?
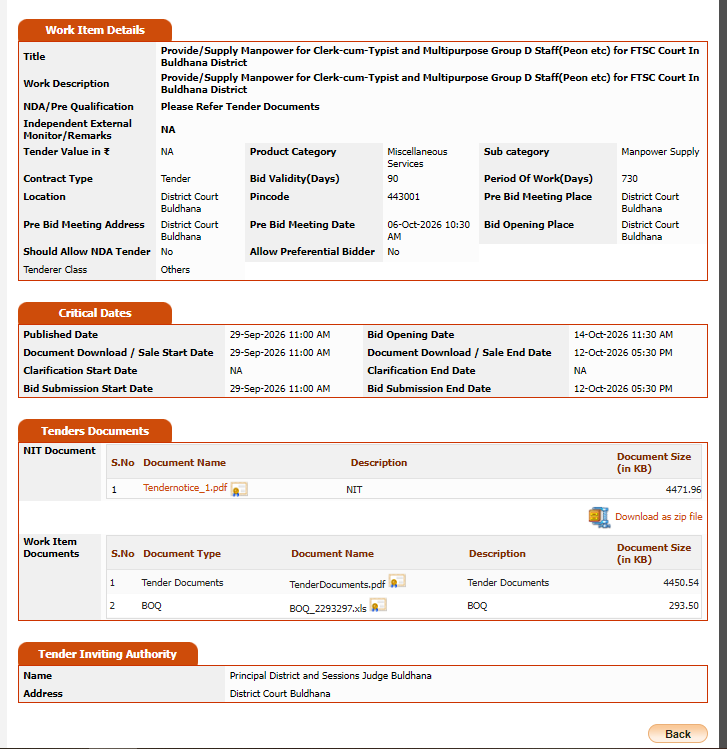
Tender Detail Page मधील Work Item Details हा tender समजण्यासाठी Basic Details पेक्षाही अधिक operational section आहे. येथे tender चा actual work scope कोणत्या प्रकारचा आहे याची प्राथमिक माहिती मिळते.
Screenshot मध्ये Title आहे:
“Provide/Supply Manpower for Clerk-cum-Typist and Multipurpose Group D Staff (Peon etc) for FTSC Court in Buldhana District”
Tender Executive ने Title फक्त tender folder चे नाव ठेवण्यासाठी वाचू नये. Title वाचताना लगेच खालील प्रश्न निर्माण झाले पाहिजेत:
किती प्रकारचे manpower? कोणत्या post साठी? कोणत्या organisation साठी? कोणत्या location साठी? किती कालावधीसाठी?
इथे Clerk-cum-Typist आणि Multipurpose Group D Staff असा manpower scope दिसतो आणि location Buldhana District शी संबंधित आहे. म्हणजे हा generic manpower tender नसून specific manpower categories शी संबंधित tender आहे.
2.17. Work Description
Screenshot मध्ये Work Description देखील title सारखेच दिसते.
Work Description हा field tender च्या कामाचे portal-level description देतो. पण practical tender executive ने येथेच scope पूर्णपणे समजला असे मानू नये. Work Description हा initial understanding point आहे.
Actual manpower संख्या, qualification, duty hours, shifts, weekly off, replacement, statutory compliance, wages, uniforms, supervision, penalties, attendance आणि payment conditions यांसाठी Tender Document/NIT/BOQ तपासणे आवश्यक आहे.
2.18. NDA / Pre-Qualification
Screenshot मध्ये NDA/Pre Qualification – Please Refer Tender Documents असे दिसते.
हा field विशेष महत्त्वाचा आहे कारण portal स्वतः सांगत आहे की pre-qualification संबंधी आवश्यक माहिती Tender Documents मध्ये refer करावी.
याचा अर्थ Tender Executive ने portal वर “Pre Qualification” समोर काही specific information दिसत नाही म्हणून qualification नाही असे समजू नये. उलट हा स्पष्ट संकेत आहे की actual eligibility conditions tender document मध्ये आहेत.
Practical rule:
जर portal वर “Please Refer Tender Documents” असे दिसले, तर ते warning समजा—Tender Document उघडून eligibility section शोधल्याशिवाय GO decision घेऊ नका.
2.19. Independent External Monitor / Remarks
Screenshot मध्ये Independent External Monitor/Remarks – NA दिसते.
या field मध्ये काही specific monitor/remarks असल्यास Tender Executive ने ते tender scrutiny मध्ये लक्षात घ्यावे. पण NA म्हणजे या field मध्ये portal वर कोणती specific information उपलब्ध नाही.
अशा fields चा अर्थ “tender मध्ये कोणतेही special condition नाही” असा काढणे योग्य नाही. Special conditions इतर tender documents किंवा ATC/STC मध्ये असू शकतात.
2.20. Tender Value
Screenshot मध्ये Tender Value in ₹ – NA दिसते.
हा अत्यंत practical point आहे.
Tender Executive ने Tender Value NA आहे म्हणून tender ला कमी महत्त्व द्यायचे नाही. अनेक tenders मध्ये portal summary वर tender value available नसू शकते किंवा वेगळ्या document/BOQ मध्ये value समजते.
अशा परिस्थितीत tender ची financial scale समजण्यासाठी BOQ, estimated value, quantity × rate structure किंवा tender document तपासावे लागते. विशेषतः manpower tenders मध्ये monthly manpower cost, contract period आणि applicable components पाहून commercial feasibility स्वतंत्रपणे calculate करावी लागू शकते.
2.21. Product Category आणि Sub Category
Screenshot मध्ये:
Product Category – Miscellaneous Services
Sub Category – Manpower Supply
असे दिसते.
हे classification tender कशा प्रकारच्या service/work मध्ये येते हे समजण्यासाठी उपयोगी आहे. Search करताना देखील अशा categories उपयोगी पडू शकतात. पण Tender Executive ने category पाहूनच tender scope final समजू नये.
उदाहरणार्थ “Manpower Supply” दिसत असले तरी actual tender मध्ये manpower सोबत equipment, supervision, consumables किंवा additional services असू शकतात. म्हणून category ही search आणि initial classification साठीची माहिती आहे; final scope Tender Document आणि BOQ मधून निश्चित करायचा.
2.22. Contract Type
Screenshot मध्ये Contract Type – Tender दिसते.
हा portal-level classification field आहे. Tender Executive ने याचा उपयोग tender ची basic contracting information समजण्यासाठी करावा. Actual contractual obligations मात्र agreement, tender conditions, work order आणि संबंधित documents मध्ये तपासाव्या लागतात.
2.23. Bid Validity – 90 Days
Screenshot मध्ये Bid Validity (Days) – 90 आहे.
Bid Validity म्हणजे bidder ने submit केलेली offer/rates ठरावीक कालावधीपर्यंत valid ठेवण्याची requirement. येथे 90 days आहेत.
याचा practical अर्थ असा की bidder ने आज rate quote केला म्हणून department ने दुसऱ्या दिवशी decision घेतलाच पाहिजे असे नाही. Tender conditions नुसार offer validity period पर्यंत quoted bid valid राहते.
Commercial planning मध्ये हा period महत्त्वाचा आहे. विशेषतः wages, material prices, transportation, statutory rates किंवा operating costs बदलणारे tenders असतील तर bid validity लक्षात घेऊन rate calculation करणे आवश्यक आहे.
2.24. Period of Work – 730 Days
Screenshot मध्ये Period of Work (Days) – 730 आहे.
730 days म्हणजे साधारण 2 वर्षांचा contract period. हा field tender च्या commercial feasibility साठी अत्यंत महत्त्वाचा आहे.
Tender Executive ने work period पाहिल्यावर फक्त “2 years contract” असे लिहून थांबू नये. पुढे costing करताना manpower cost, wage revision, statutory contribution, bonus, leave replacement, supervision, administrative cost, escalation provisions आणि contract conditions यांचा कालावधीशी संबंध तपासावा.
2.25. Location आणि Pincode
Screenshot मध्ये:
Location – District Court Buldhana
Pincode – 443001
दिसते.
Location ही tender execution साठी अत्यंत महत्त्वाची आहे. Company ची registered office location आणि actual work location वेगळी असल्यास mobilisation, local manpower, supervisor, accommodation, transportation, administrative support आणि local statutory requirements यांचा विचार करावा लागू शकतो.
म्हणून Tender Detail Page वर location दिसताच Tender Executive ने आपल्या internal feasibility check मध्ये “आपण हा contract प्रत्यक्षात execute करू शकतो का?” हा प्रश्न विचारला पाहिजे.
2.26. Pre-Bid Meeting Place
Screenshot मध्ये Pre Bid Meeting Place – District Court Buldhana आहे.
Pre-bid meeting असल्यास interested bidders ना tender मधील doubts/clarifications department समोर मांडण्याची संधी मिळू शकते. Meeting place पाहून physical participation आवश्यक आहे का, travel planning लागेल का, authorised representative कोण जाईल इत्यादी practical planning करता येते.
2.27. Pre-Bid Meeting Date
Screenshot मध्ये 06-Oct-2026 10:30 AM अशी तारीख/वेळ दिसते.
हा field Tender Monitoring साठी अत्यंत महत्त्वाचा आहे. Pre-bid date miss झाली तर clarification opportunity कमी होऊ शकते. त्यामुळे tender shortlist झाल्यावर closing date सोबत pre-bid date स्वतंत्रly calendar/task list मध्ये capture करणे ही professional tender desk practice असावी.
2.28. Bid Opening Place आणि Bid Opening Date
Screenshot मध्ये Bid Opening Place District Court Buldhana आणि Basic Details मध्ये Bid Opening Date देखील दिसते.
Bid opening म्हणजे tender submission नंतर department bid उघडण्याची प्रक्रिया. Tender Executive ने closing date आणि opening date यांची गल्लत करू नये.
Closing Date = bidder ने bid submit करण्याची अंतिम वेळ.
Opening Date = department bid opening process सुरू करण्याची तारीख/वेळ.
Tender Monitoring करताना दोन्ही dates स्वतंत्रपणे track करणे आवश्यक आहे.
2.29. Allow Preference to Tenderer
Screenshot मध्ये No दिसते.
हा field tender मध्ये काही specified category/preference mechanism लागू आहे का हे portal-level वर दर्शवतो. “No” असल्यास portal वर त्या specific preference ची सुविधा दाखवलेली नाही.
पण bidder-specific benefits किंवा government procurement preferences बाबत फक्त या एका field वर निर्णय न घेता applicable tender conditions आणि relevant procurement rules तपासणे आवश्यक आहे.
2.30. Critical Dates – Tender Timeline समजण्याचा केंद्रबिंदू
Tender Detail Page मधील Critical Dates section Tender Executive ने अत्यंत काळजीपूर्वक वाचला पाहिजे. Screenshot मध्ये खालील माहिती दिसते:
- Published Date – 29-Sep-2026 11:00 AM
- Document Download / Sale Start Date – 29-Sep-2026 11:00 AM
- Bid Submission Start Date – 29-Sep-2026 11:00 AM
- Document Download / Sale End Date – 12-Oct-2026 05:30 PM
- Bid Submission End Date – 12-Oct-2026 05:30 PM
- Bid Opening Date – 14-Oct-2026 11:30 AM
- Clarification Start Date – NA
या section मधून tender चा complete submission timeline समजतो.
Tender Executive ने प्रत्येक tender साठी कमीतकमी तीन dates independently note कराव्यात—Bid Submission End Date, Pre-Bid Date आणि Bid Opening Date. पण त्याचबरोबर document download end date आणि clarification period देखील तपासावा.
सर्वात महत्त्वाची practical सवय म्हणजे closing date ला final working time समजू नये. Company मध्ये internal cut-off यापूर्वी ठेवणे चांगले. कारण DSC problem, portal issue, payment issue, document correction, BOQ error किंवा internet/system problem शेवटच्या क्षणी आल्यास tender submission धोक्यात येऊ शकते.
2.31. Tender Documents – NIT Document
Screenshot मध्ये Tenders Documents section मध्ये NIT Document दिसत आहे.
NIT म्हणजे Notice Inviting Tender. हा tender चा अत्यंत महत्त्वाचा primary document आहे. Portal वर NIT file उपलब्ध असल्यास Tender Executive ने ती download करून tender folder मध्ये सुरक्षित ठेवावी.
NIT मधून tender issuing authority, work name, basic requirements, important dates, tender fee/EMD, eligibility, submission instructions आणि अनेक प्राथमिक conditions मिळू शकतात. मात्र NIT हे संपूर्ण tender document असेलच असे नाही; portal वर उपलब्ध इतर tender documents देखील तपासावे लागतात.
2.32. Work Item Documents – Tender Documents PDF
Screenshot मध्ये Work Item Documents अंतर्गत TenderDocuments.pdf दिसत आहे.
ही file tender च्या detailed conditions समजण्यासाठी अत्यंत महत्त्वाची असते. Tender Executive ने ही file download करून फक्त “documents received” म्हणून folder मध्ये ठेवू नये.
यातून actual scope, eligibility, technical conditions, commercial conditions, statutory compliance, manpower requirements, submission requirements, penalties, payment terms, agreement conditions आणि इतर tender-specific clauses शोधाव्या लागतात.
याच file मध्ये अनेक वेळा portal वर दिसत नसलेली critical information असते. त्यामुळे Tender Detail Page पाहणे म्हणजे tender reading पूर्ण झाली असे कधीही समजू नये.
2.33. BOQ – Excel File
Screenshot मध्ये BOQ_2293297.xls अशी BOQ file दिसते.
BOQ म्हणजे Bill of Quantities. Financial bid समजण्यासाठी ही अत्यंत महत्त्वाची file आहे.
Tender Executive ने BOQ download केल्यानंतर त्यामधील item description, quantity, unit, rate columns, total calculation आणि financial submission structure तपासावे. BOQ ही costing team/management decision साठीही महत्त्वाची असते कारण actual commercial requirement याच financial structure मधून समजते.
विशेषतः manpower/service tender मध्ये BOQ मधील quantity, manpower category, period आणि applicable unit यांचा tender document मधील scope शी match करणे आवश्यक आहे.
2.34. Download as ZIP File
Screenshot मध्ये Download as zip file option दिसतो.
जर portal वर अनेक tender documents असतील तर प्रत्येक file individually download करण्याऐवजी ZIP option उपलब्ध असल्यास ते वापरून documents एकत्र download करता येतात.
Practical tender file management मध्ये download झाल्यानंतर ZIP file ला tender folder मध्ये सुरक्षित ठेवणे आणि त्यातील extracted documents योग्य naming sequence ने व्यवस्थित ठेवणे उपयोगी ठरते. मात्र ZIP download झाला म्हणजे files उघडून verify करण्याची गरज नाही असे नाही. प्रत्येक downloaded document successfully open होत आहे का हे तपासणे आवश्यक आहे.
2.35. Tender Inviting Authority
सर्वात शेवटी screenshot मध्ये Tender Inviting Authority section आहे.
येथे:
Name – Principal District and Sessions Judge Buldhana
Address – District Court Buldhana
अशी माहिती आहे.
Tender Inviting Authority म्हणजे tender process formally invite करणारी authority. Tender Executive साठी हे नाव पुढील official communication मध्ये अत्यंत महत्त्वाचे ठरते. Clarification, representation, request letter, extension request, acceptance-related communication किंवा contract-related correspondence तयार करताना योग्य authority/office address वापरणे आवश्यक असते.
म्हणून Tender Detail Page च्या शेवटी असलेला हा छोटा section दुर्लक्षित करू नये. Department कोणता आहे हे search करताना समजते; पण official communication कोणत्या authority कडे करायचे यासाठी Tender Inviting Authority ची माहिती उपयोगी पडते.
Tender Detail Page वाचण्याची Practical Methodology
Tender Executive ने प्रत्येक tender उघडल्यानंतर वरून खाली फक्त information वाचत बसण्याऐवजी एक ठरावीक reading sequence वापरावा:
पहिला टप्पा – Tender Identity:
Organisation Chain → Reference Number → Tender ID → Tender Type → Tender Category
दुसरा टप्पा – Commercial Entry Check:
Tender Fee → Processing Fee → EMD → Exemption → Payment Instrument
तिसरा टप्पा – Submission Structure:
No. of Covers → Fee/Technical Cover → Finance Cover → BOQ format
चौथा टप्पा – Work Feasibility:
Work Item Title → Work Description → Location → Period of Work → Bid Validity → Pre-Bid details
पाचवा टप्पा – Deadline Control:
Published Date → Bid Submission Start → Bid Submission End → Bid Opening → Pre-Bid Date
सहावा टप्पा – Documents:
NIT → Tender Document → BOQ → इतर attachments
सातवा टप्पा – Authority:
Tender Inviting Authority → Address
या sequence मुळे Tender Executive tender page उघडल्यानंतर “काय पाहायचे?” याबाबत confusion राहत नाही.
सर्वात महत्त्वाचा Practical Rule
Tender Detail Page हा tender चा “index / dashboard” समजा; तो tender चा पूर्ण पर्याय नाही.
Portal वरील page आपल्याला tender ची identity, dates, fee/EMD, work summary, documents आणि authority यांची दिशा देतो. त्यानंतर NIT + Tender Document + BOQ + Corrigendum/Addendum + applicable ATC/STC यांचा अभ्यास करूनच final GO/NO-GO, costing आणि bid submission decision घ्यायचा.
म्हणजेच Tender Executive ची working chain अशी असावी:
Search → Tender List → Tender Detail Page → Documents Download → NIT/Tender Document Reading → BOQ Study → Eligibility Check → Costing → Internal Approval → Bid Preparation → Submission
हीच सवय नवीन Tender Executive ला portal वर फक्त “tender शोधणारा कर्मचारी” न ठेवता पूर्ण tender scrutiny करू शकणारा executive बनवते.
—————————————————————————————————-
Topic 3 – Tender File Download, Extraction & BOQ Access Procedure
Tender listing आणि Tender Detail Page वर tender ची प्राथमिक माहिती तपासल्यानंतर पुढील अत्यंत महत्त्वाची practical activity म्हणजे Tender Documents आणि BOQ files योग्य पद्धतीने download करून सुरक्षितपणे open करणे. Tender Executive ने फक्त tender notice पाहून पुढे जाऊ नये. प्रत्यक्ष tender समजण्यासाठी NIT/Tender Notice, Tender Document, BOQ आणि उपलब्ध इतर documents आपल्या system मध्ये download करून ठेवणे आवश्यक असते. कारण पुढील eligibility checking, technical conditions, scope of work, commercial conditions, EMD/Tender Fee, payment terms, manpower requirements, specifications आणि BOQ यांचा अभ्यास याच downloaded files मधून केला जातो.
3.1. Tender Documents कुठून Download करायचे?
MahaTenders वरील Tender Detail Page मध्ये Tenders Documents किंवा त्यासारख्या section मध्ये tender शी संबंधित downloadable files दिलेल्या असतात. सामान्यतः येथे Tender Notice / NIT, Tender Document आणि BOQ अशा वेगवेगळ्या files दिसू शकतात. प्रत्येक tender मध्ये documents ची संख्या आणि त्यांची नावं सारखीच असतील असे नाही. त्यामुळे Tender Executive ने फक्त एका PDF वर अवलंबून न राहता त्या tender page वर उपलब्ध असलेल्या सर्व downloadable documents ची नोंद करून ते download करणे ही सवय लावून घ्यावी.
विशेषतः tender notice किंवा NIT मध्ये tender ची basic information मिळते; परंतु detailed eligibility, scope, terms & conditions, technical requirements, submission instructions आणि contractual conditions अनेकदा मुख्य Tender Document मध्ये असतात. त्याचप्रमाणे financial bid साठी वापरला जाणारा BOQ वेगळ्या Excel format मध्ये उपलब्ध असू शकतो. म्हणून “Tender Download” म्हणजे एकच PDF download करणे नव्हे; tender page वर उपलब्ध असलेली complete tender file set व्यवस्थित घेणे असा त्याचा अर्थ समजला पाहिजे.
3.2. Tender Notice / NIT Download करण्याची पद्धत
Tender Detail Page वर Tender Notice / NIT Document ची link दिलेली असल्यास त्या document वर click करावे. Portal कडून document download करण्यापूर्वी अनेक वेळा Captcha Code दाखवला जातो. स्क्रीनवर दिसणारा captcha code जसा आहे तसाच संबंधित box मध्ये enter करून download process पुढे न्यावी.
Captcha हा portal वरील automated/bot access रोखण्यासाठी वापरला जाणारा verification step आहे. त्यामुळे captcha चुकीचा enter झाल्यास document download होणार नाही किंवा पुन्हा captcha generate करण्याची आवश्यकता पडू शकते. अशावेळी घाई न करता नवीन captcha नीट वाचून enter करावा.
Document download झाल्यानंतर तो file आपल्या tender folder मध्ये व्यवस्थित save करावा. Download केलेल्या file चे नाव शक्यतो बदलून स्वतःच्या naming system नुसार ठेवता येते; मात्र original document ओळखता येईल अशी माहिती filename मध्ये ठेवणे चांगले.
उदाहरणार्थ:
01_NIT_TenderNotice.pdf
02_TenderDocument.pdf
03_BOQ.zip
अशा प्रकारे क्रमांक देऊन files ठेवले तर पुढील अभ्यासाच्या वेळी कोणती file आधी उघडायची हे लगेच समजते.
3.3. BOQ Download करण्याची वेगळी पद्धत
BOQ अनेकदा PDF स्वरूपात नसून ZIP file किंवा compressed file स्वरूपात उपलब्ध असतो. Tender Detail Page वर BOQ समोर download option/link दिलेला असल्यास त्यावर click करून captcha process पूर्ण करावी आणि BOQ file download करावी.
BOQ download झाल्यानंतर ती ZIP file थेट Excel मध्ये उघडता येत नाही. प्रथम ZIP file Extract करणे आवश्यक असते. त्यामुळे Tender Executive ने ZIP file download झाल्यानंतर ती कुठे save झाली आहे हे तपासावे आणि ती tender folder मध्ये ठेवावी.
उदाहरण:
Tender Folder
→ 01_NIT
→ 02_Tender_Document
→ 03_BOQ
→ 04_Corrigendum
→ 05_Other_Documents
अशा folder structure मुळे tender चा अभ्यास करताना files शोधण्यात वेळ जात नाही.
3.4. ZIP File Extract करण्याची पद्धत
BOQ ची ZIP file download झाल्यानंतर तिच्यावर Right Click → Extract All किंवा system मध्ये उपलब्ध असलेल्या extraction option चा वापर करून ZIP file extract करावी.
Extract केल्यानंतर त्यामध्ये BOQ ची actual Excel file दिसू शकते. उदाहरणार्थ ती .xls किंवा .xlsx format मध्ये असू शकते.
महत्त्वाची गोष्ट म्हणजे ZIP file delete करू नये. Original downloaded ZIP file देखील tender folder मध्ये सुरक्षित ठेवणे चांगले आहे आणि त्यासोबत extracted BOQ ची copy ठेवावी. यामुळे भविष्यात original download record उपलब्ध राहतो.
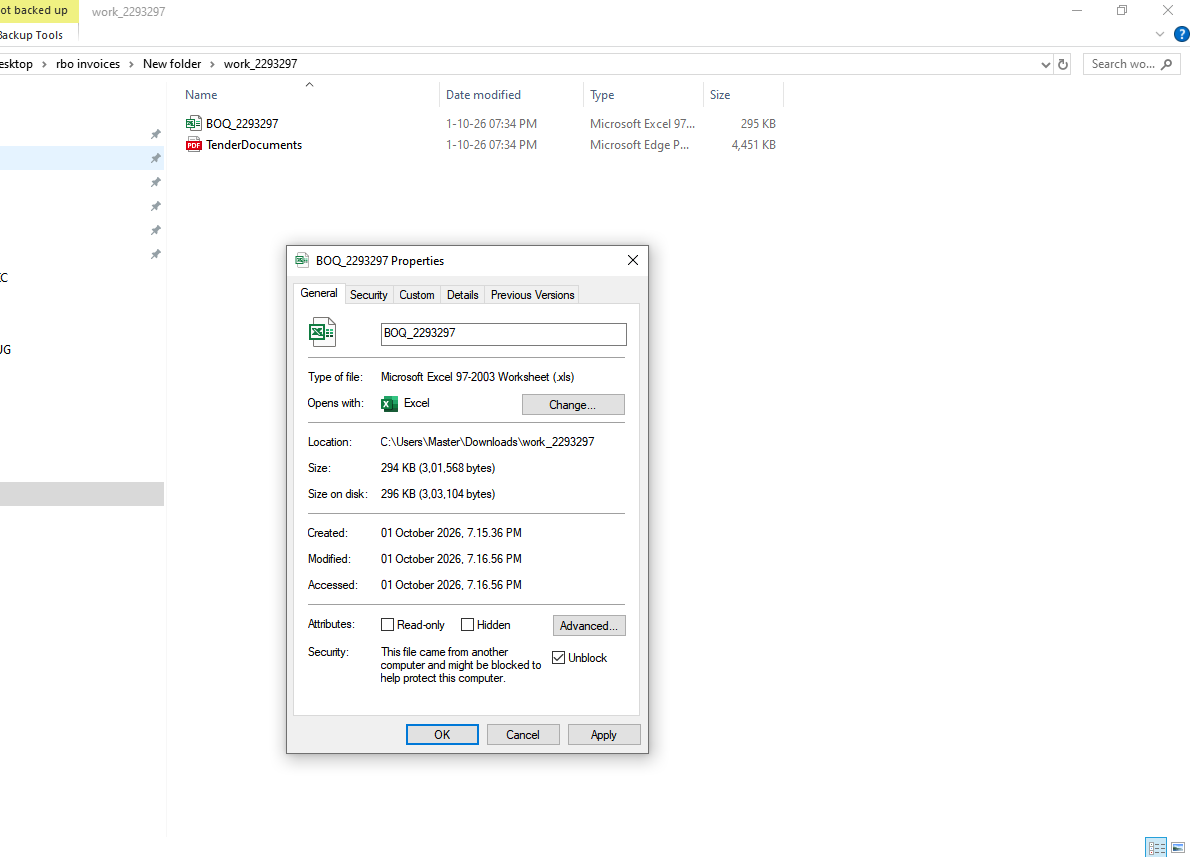
3.5. BOQ File Open होत नसेल तर – Unblock करण्याची पद्धत
काही वेळा Government portal वरून download केलेली BOQ Excel file Windows security मुळे लगेच properly open होत नाही किंवा file protected/downloaded-file warning मुळे access मध्ये अडचण येऊ शकते. अशा वेळी Windows मध्ये file ला Unblock करण्याचा option उपलब्ध असल्यास तो वापरता येतो.
यासाठी प्रथम downloaded आणि extracted BOQ file वर Right Click करावे. त्यानंतर Properties मध्ये जावे. Properties window च्या खालील भागात security-related message असल्यास त्याखाली Unblock नावाचा checkbox/option दिसू शकतो.
जर Unblock option उपलब्ध असेल तर:
Right Click → Properties → Unblock → Apply → OK
अशी प्रक्रिया करावी.
त्यानंतर BOQ file पुन्हा open करून पाहावी. File योग्य प्रकारे open झाल्यास BOQ मधील financial items, quantities, units आणि इतर available information अभ्यासता येते.
महत्त्वाचे: Unblock option प्रत्येक file मध्ये दिसेलच असे नाही. तो दिसत असल्यासच ही प्रक्रिया करावी. दिसत नसल्यास जबरदस्तीने दुसरी security setting बदलण्याची आवश्यकता नाही.
3.6. BOQ का इतका महत्त्वाचा आहे?
Tender Executive साठी BOQ ही फक्त “एक Excel file” नसते. Financial Bid मध्ये bidder ला कोणत्या items/activities साठी rate भरायचा आहे, quantity काय आहे, unit कोणते आहे आणि financial submission कोणत्या format मध्ये करायचे आहे हे समजण्यासाठी BOQ अत्यंत महत्त्वाचा असतो.
उदाहरणार्थ manpower tender मध्ये BOQ मध्ये manpower category, quantity किंवा financial bidding शी संबंधित columns असू शकतात; civil किंवा material tender मध्ये item description, quantity, unit, rate आणि amount यासारखी रचना असू शकते. त्यामुळे BOQ उघडल्याशिवाय tender ची financial structure पूर्णपणे समजली असे समजू नये.
याच कारणामुळे Tender Executive ने BOQ download केल्यानंतर त्याची स्वतंत्रपणे तपासणी करावी आणि tender costing करण्यापूर्वी BOQ मध्ये नेमके काय मागितले आहे हे समजून घ्यावे.
3.7. Tender Download झाल्यानंतर लगेच काय करायचे?
सर्व files download झाल्यानंतर लगेच quotation किंवा costing सुरू करणे योग्य नाही. प्रथम downloaded documents व्यवस्थित arrange करून document completeness check करावा.
एक practical sequence असा ठेवता येईल:
Tender Search → Tender Listing → Tender Detail Page → NIT/Tender Notice Download → Tender Document Download → BOQ Download → ZIP Extract → BOQ Access → Documents व्यवस्थित Save → Tender Reading सुरू
यामुळे tender executive कडून एखादी महत्त्वाची file download करायची राहण्याची शक्यता कमी होते.
3.8. Tender Folder मध्ये Original Files सुरक्षित ठेवणे
Tender documents download केल्यानंतर त्यांना एका dedicated tender folder मध्ये ठेवावे. Tender ID, organisation आणि short tender description वापरून folder तयार करणे सर्वात practical पद्धत आहे.
उदाहरण:
2026_BHCMU_1341628_1_Manpower_Tender
या folder मध्ये:
01_NIT
02_Tender_Document
03_BOQ
04_Corrigendum
05_Clarifications
06_Internal_Working
अशी रचना ठेवता येते.
याचा फायदा असा की पुढे tender वर technical discussion, costing, clarification किंवा bid submission करताना portal पुन्हा उघडून document शोधण्याची गरज कमी होते.
3.9. एक महत्त्वाची Practical सवय
Tender Executive ने “Download झाले म्हणजे काम झाले” असा दृष्टिकोन ठेवू नये. प्रत्येक downloaded file एकदा योग्य प्रकारे save झाली आहे का, PDF उघडतो का, ZIP extract झाला का, BOQ accessible आहे का, document complete आहे का हे तपासणे आवश्यक आहे.
विशेषतः BOQ बाबतीत download झाल्यानंतर तो file वास्तवात open होत आहे की नाही हे bid submission किंवा costing च्या अगोदरच तपासणे महत्त्वाचे आहे. शेवटच्या दिवशी BOQ open होत नाही, file corrupt आहे किंवा download incomplete आहे असे लक्षात आले तर अनावश्यक pressure निर्माण होऊ शकतो.
Practical Flow
Tender Detail Page
↓
Tender Notice / NIT Download
↓
Captcha Enter
↓
PDF Save
↓
Tender Document Download
↓
BOQ Download
↓
ZIP File Extract
↓
BOQ Excel File मिळवा
↓
गरज असल्यास Right Click → Properties → Unblock → Apply → OK
↓
BOQ Open & Verify
↓
सर्व Original Documents Tender Folder मध्ये व्यवस्थित Save
↓
यानंतर Tender Reading & Eligibility Analysis सुरू
ही प्रक्रिया समजून घेतल्यानंतरच पुढील टप्पा म्हणजे download केलेल्या Tender Document चे systematic reading आणि clause-wise analysis सुरू करायचे.